Time Card System Help
Click below to jump to a topic.
I. How It Works
II. Add to Home Screen
III. Punch-In and Out
IV.Time Sheet Editor
V. Time Sheet Approval Form
VI. Time Sheet Viewer
How It Works
Back to top
After you sign up (as company), you will be prompted to create an account administrator.
By default, the system creates generic project/client name, team name, and a task. And will assign you to a team and a project/client. These can be edited in the 'Settings' page later.
If logged-in, you'll get into the 'Punch-In/Punch-Out' page and, from there, you can go to the 'Settings' page, where you can:
a. Add/edit users
b. Add/edit teams
c. Add/edit projects or clients
d. Add/edit tasks
e. Edit Company profile and options
f. Assign project or client to employees
g. Assign employee to a team
Once you're done setting up all the preliminary data in your settings page, you can:
a. Start punching-in/out
b. Start approving time sheets
c. Start reviewing time sheets and more
Time-In/Out has two options:
1. By-The-Minute
Whatever time, in minute, you clocked-in or clocked-out that will be your actual timesheet.
2. Quarterized
The actual punch-in/out time is rounded-off to the nearest quarter of an hour. The rounded-off value will show on your time sheet, but the real time-in/out time is kept in the database. Examples below:
Actual:07:07->Result:07:00
Actual:07:08->Result:07:15
Actual:07:52->Result:07:45
Actual:07:53->Result:08:00
Back to top
Add To Home Screen
Back to top
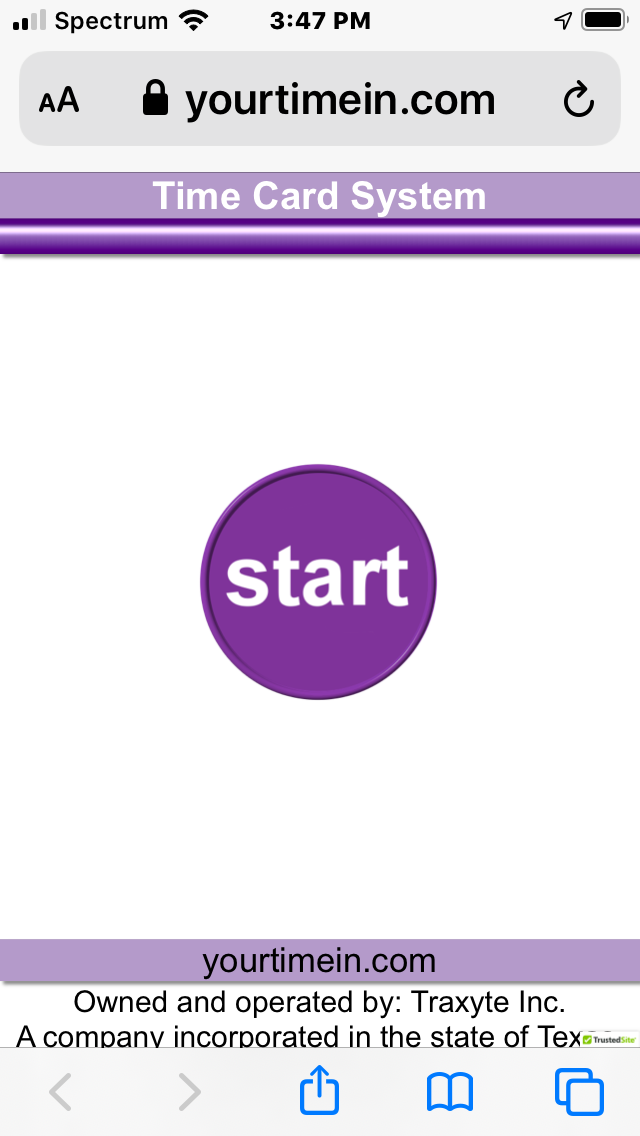
If you are on a mobile device i.e. smartphone or tablet, and you are logged-in using your user name and password you should first see a 'start' button (see image).
While on this screen, use your device's menu option to 'Add to Home Screen'. Please consult your device's manual for the steps on how to do that.
You may change the name of your icon but by default it should say 'Mobile Time Card' and it will create a golden bundy clock icon on your home screen.
Make sure you are logged-in as yourself before creating your home screen icon. Each time you hit the icon, your mobile time card system will be launched as if you are logged-in. It works like a mobile app, but no software download necessary.
Back to top
Punch-In/Punch-Out
Back to top
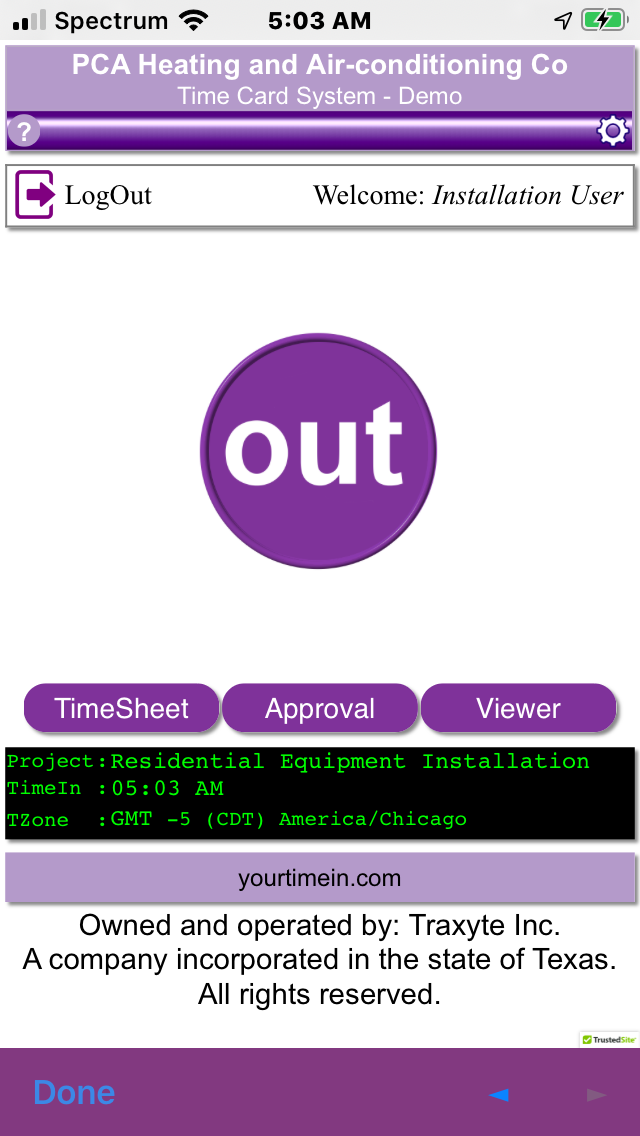
On mobile device (smart phone or tablet) and on desktop/laptop, you will see in or out and Save buttons in the middle of your device's screen. If you have a pre-assigned project / client, it should show in the black box along with your device's current Time Zone setting.
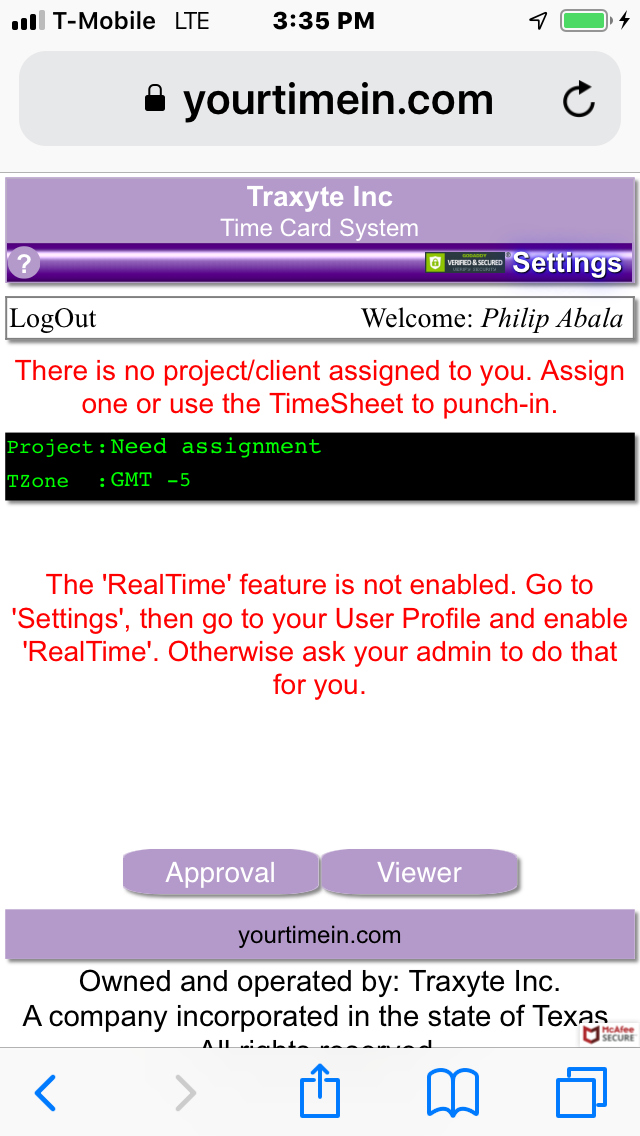
If the 'RealTime' feature is disabled or there is no project / client assigned, you will not see the 'IN/OUT' and 'Save' buttons(see image below):
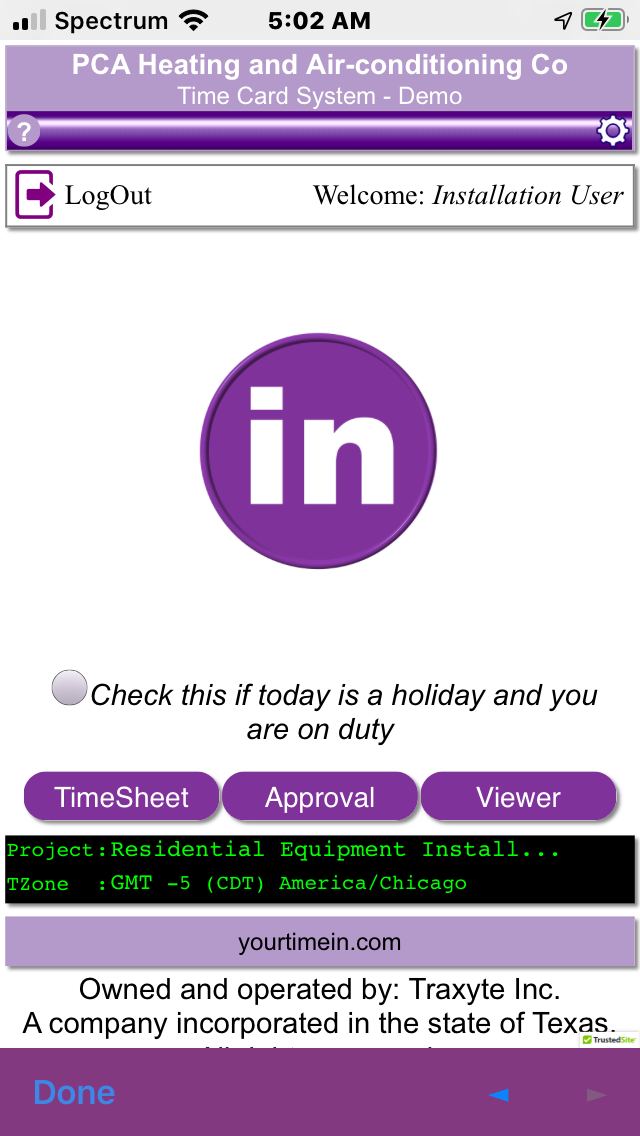
If the 'Manual Punch-In/Punch-Out' feature is enabled, you will see three buttons (including 'TimeSheet') at the bottom of the screen(see image):
a1. Press the 'in' button to punch-in in real time.
b1. Check the "Check this if today is a holiday and you are on duty" checkbox to indicate a holiday over time work.
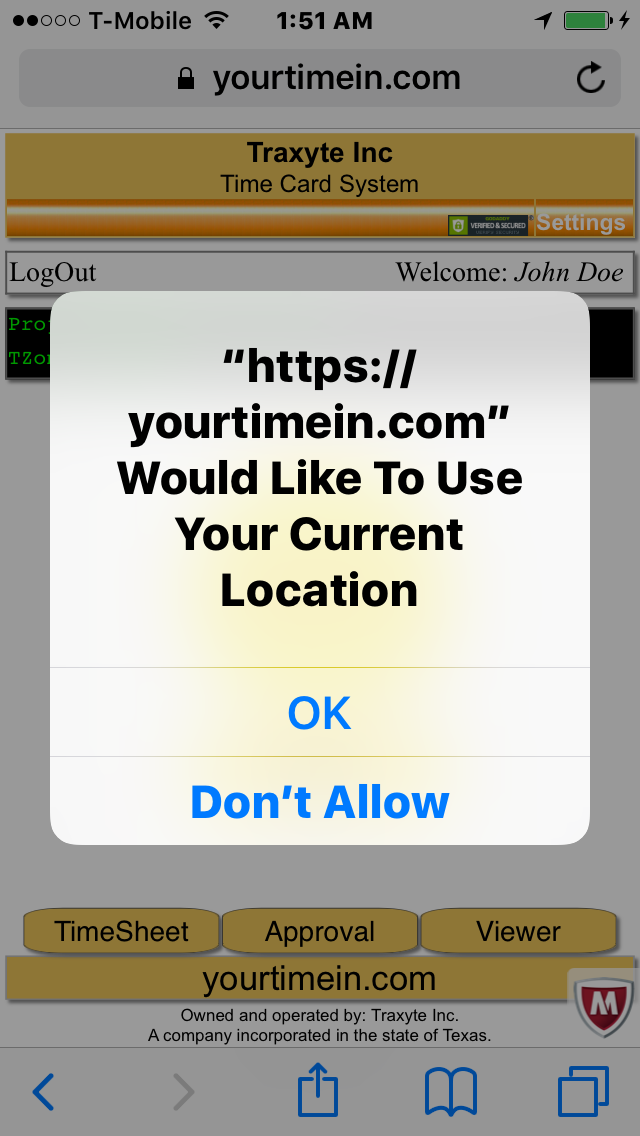
c1. When prompted with 'https://yourtimein.com wants to use your current location...', you should select 'OK', otherwise your real time info won't be saved. This is important if your 'RealTime' feature is enabled. Otherwise you will need a lot of explaining to your supervisor. So, be very careful.
d1. Press the 'Save' button to save your punch data.
e1. After you press 'Save', you should see your punch-in time (in the nearest quarter of an hour), see the sample image below:
a2. You can only punch out after, at least, 8 to 15 minutes from your punch in time.
b2. Press 'out' to record your time out, then follow steps c1 and d1 when prompted.
c2. After you punched out, you will see only Project or Client name and TZone info in the black box.
d2. You can punch back in right after you punch out.
e2. If you need to add info to your time sheet for a particular time-in/out period such as mileage, expenses, notes and tasks performed or just want to check whether your GPS location was properly captured, you may do so by clicking the 'TimeSheet' button at the left bottom of your device's screen. Take note, this is only possible if the 'Manual Punch-In/Punch-Out' feature is enabled. This will be explained in detail next.
Back to top
TimeSheet
Back to top
On your mobile device (also available on your desktop with more info display) click the 'TimeSheet' button to launch your 'Time Sheet Editor'. Here, you can add time sheet entry, edit or delete time sheet:
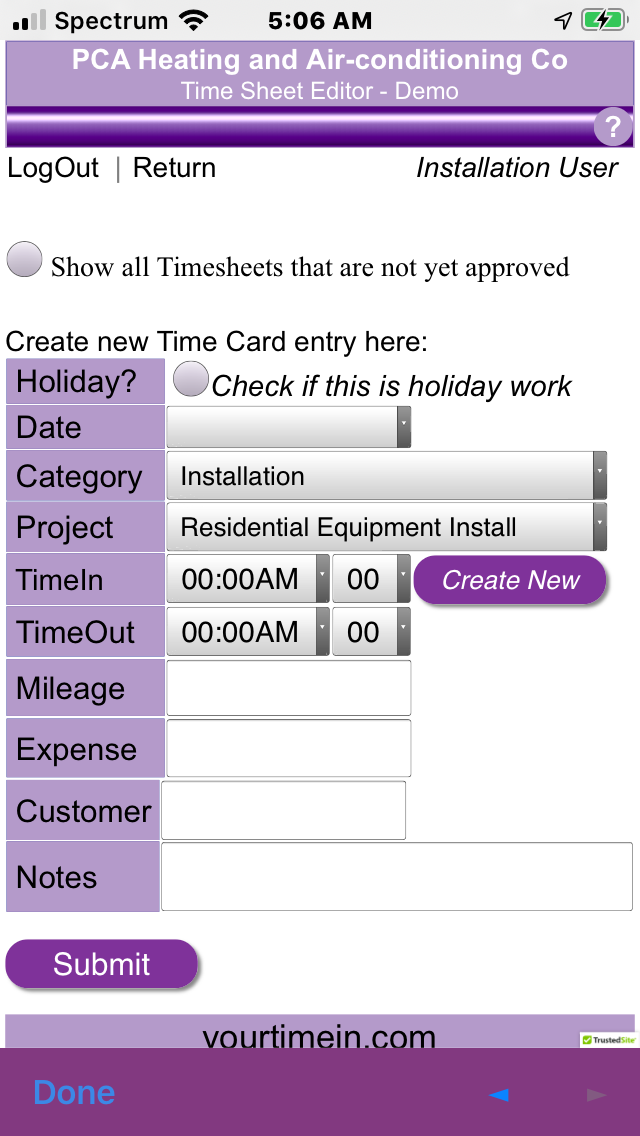
a1. Check the 'Show all time sheets that are not yet approved' to list all timesheets or uncheck to list only the new ones.
b1. Check the 'Check if this is a holiday work' if today is a holiday and you are on duty.
c1. If you have a pre-assigned project or client it should show on the 'Category' and 'Project/Client' drop down boxes. If this is the case, you don't need to select it again.
d1. Click 'Create New' then press on the 'Date' box to select a date, then select time-in and time-out manually, if you intend to manually punch-in/out and click 'Submit'.
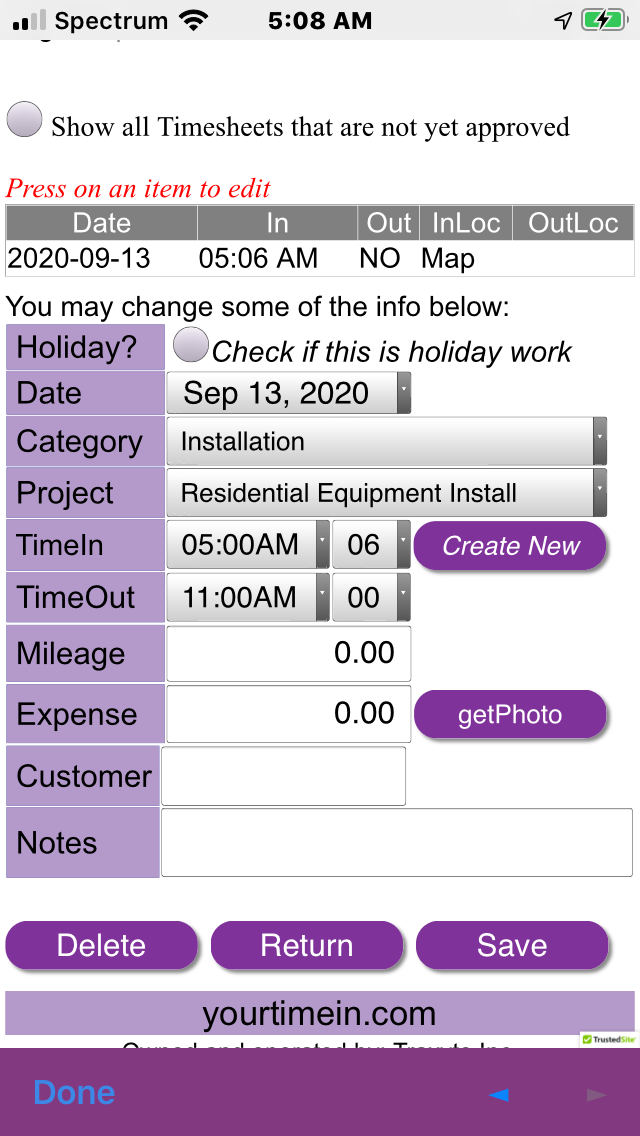
e1. To punch out (in the Time Sheet Editor) for an existing punch-in record, click on an item from the time sheet entries listed (it should be the one which says 'NO' on the TimeOut column, refer to the image above). Then select hour and min.
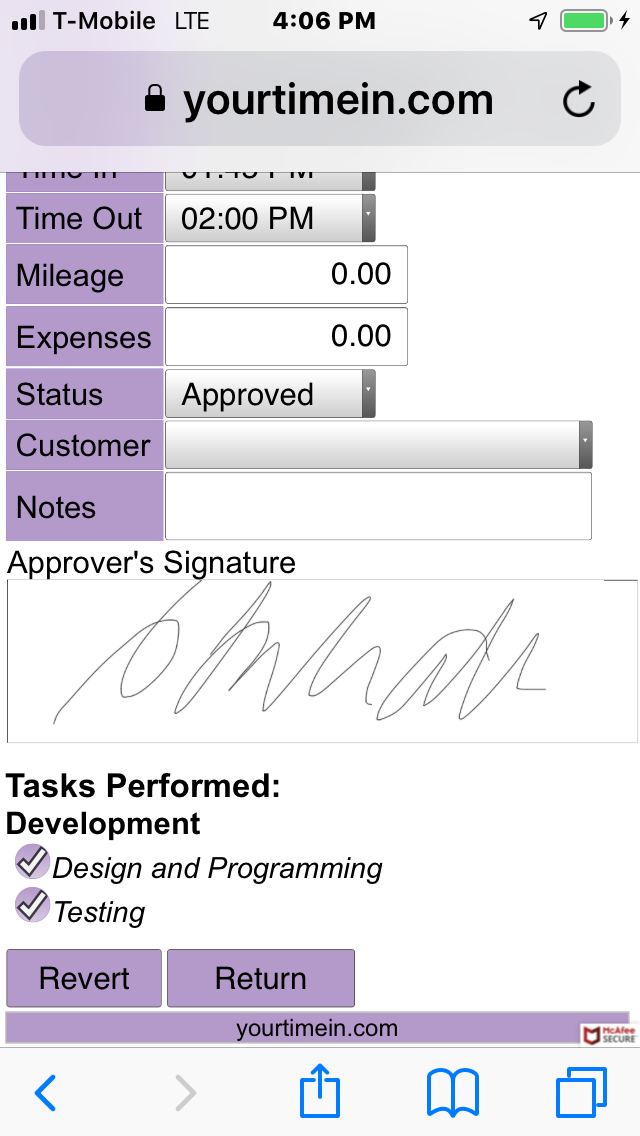
f1. At this point, you can add more info to your time sheet such as mileage, expenses (if any), notes, and tasks performed for that time period (see image below).
g1. Press the 'Save' button to save your punch data (see image below).
a2. Manual Time-In/Out: You can manually punch-in using the 'Time Sheet Editor'. This feature can be enabled/disabled in your Profile Editor. This is designed primarily for when you miss to punch-in/out at the right time. You must talk to your supervisor if you want to do this, while your 'RealTime' feature is available.
b2. If you have a pre-assigned project or client, it should show on the 'Category' and 'Project/Client' boxes. All you need to do is select a date (on the Date box), an 'Hour' and 'Min' from the drop down boxes for 'TimeIn' and on 'TimeOut' drop down boxes. There is no restriction on manually punching-in/out. That means you can manually punch-in/out for any date or time. All it would check for is a possible duplicate entries (date and time). The system will alert you when it happens. Here, you can also, include additional info such as mileage, expenses, notes and tasks performed for a particular time-in/out period.
c2. You may also select a category and project other than what is pre-assigned to you, by selecting them from the 'Category' and 'Project/Client' drop down boxes. And then, select times (Hour and Min) from the 'TimeIn' and 'TimeOut' drop down boxes, add more info, if any, then 'click 'Submit'.
a3. Edit/Delete Time-In/Out entry: In 'Time Sheet Editor' screen, you can edit a time sheet entry by selecting it from the list and change or add info such as mileage, expenses, notes and tasks.
b3. Remember that you can only make the changes to your time sheet entries while it is still in the 'New' status. No more changes can be made once a time sheet has been approved. Tip: you would no longer see your time sheet entry on the 'Time Sheet Editor' when it's been approved.
c3. If you think, there is an error in your time sheet entry that cannot be rectified via an edit, such as your GPS location when you punch-in in real time, you may delete that entry and punch-in again in real time. You should take this action, within 7 minutes from when you originally punched-in. If you miss the (less than) 7 min, your computed time-in will take the next quarter of an hour. This computation is explained next. You can only do this at punch-in time ( within 7 min). Otherwise, you have to manually punch-in/out for that missed period.
a4a. By-The-Minute Timesheet:
Whatever time, in minute, you clocked-in or clocked-out that will be your actual timesheet.
a4b. Time-In/Out quarterized computation:
The computed time is rounded-off to the nearest quarter of an hour. Examples below (applies to both punch-in/out in real time):
Actual:07:07AM->Result:07:00
Actual:07:08AM->Result:07:15
Actual:07:52AM->Result:07:45
Actual:07:53AM->Result:08:00
Take note, that the actual punch-in/out times are still recorded and kept for audit purposes.
Back to top
Approval Form
Back to top
Here, you can approve a time sheet if you are an Admin, TeamLead, or an Approver.
a. TeamLead and Approver should be able to see, in the list, the time sheets of the employees in his/her team (see image below).
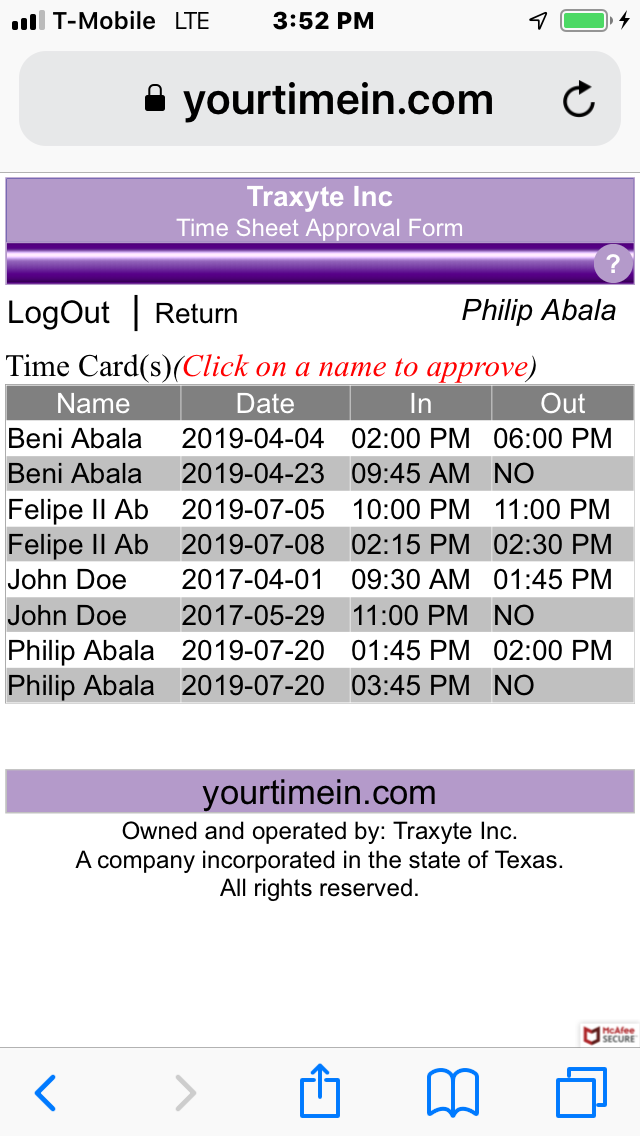
b. Admin, will be able to see all time sheets regardless of team membership.
c. Select an item in the list. This should take you to a detailed info of that time sheet. You can review the info, sign, click 'Save Signature' and click 'Approve' or 'ApproveAll'. It will approve only that particular item, you selected if you clicked 'Approve'. If you clicked 'ApproveAll, it will approve all time sheets for that employee.

d. Notice that when you select an item, it also filters out all others, leaving you with only the time sheets of the employee you selected, if there is more than one.
e. Once a time sheet has been approved, the only way it can be edited or deleted is for an Admin/TeamLead/Approver to go to the Time Sheet Viewer and 'Revert' that time sheet. So make sure you agree with the information presented in each time sheet before approving.
f. If 'Signature' is enabled, it also allows the employee to view his/her time sheets in the 'Approval Form' screen if the 'NoLogin' feature is enabled. The reason behind this is for your client (such as Home Care client) to be able to approve/sign the time sheet without logging-in to the system much like signing on paper time sheet. That signature is being captured and stored for that particular time sheet. You can enable/disable this feature for a specific employee, using the 'User Profile Editor'.
g. If you enabled 'RealTime' or the approver has the ability to log-in to the system and the employee have punched-in in real time, you don't need this signature feature. Your real time GPS location and log-in approval for each time sheet is enough to validate the data.
Back to top
Time Sheet Viewer
Back to top
Here, you can view time sheets and generate summaries for a week or month for an employee, also available on mobile device (smart phone or tablet) with limited features:
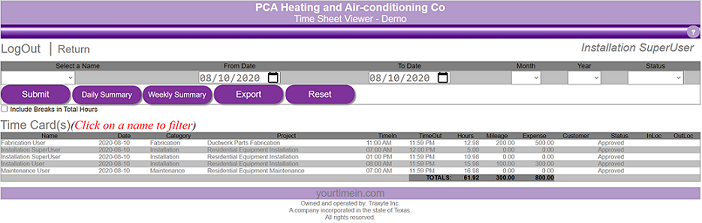
a. If you are an Admin, you can see all time sheets. TeamLead and Approver can see only the time sheets of their team members. This lists all time sheets - New and Approved.
b. Users can see only their own time sheets - New and Approved.
c. Admin, TeamLead and Approver can 'Revert' an approved time sheets of their team members. Just select that particular timesheet in the list to view the details and click 'Revert'.
d. Use the drop down boxes to filter your viewer - by name, week, month and time sheet status and click 'Submit'.
e. Select a name, a date or month and click 'Daily Summary', to create a summary report for that employee. It summarizes the approved hours worked, mileage and expenses for the selected time period on a per day basis. So, if an employee has more than one time sheets for a day, it will sum up and show only the total for that day.
f. If you entered a date, it summarizes the time sheet data for that employee for the week beginning the date you entered.
g. If you selected month, it summarizes the time sheet data for the selected month for that employee.
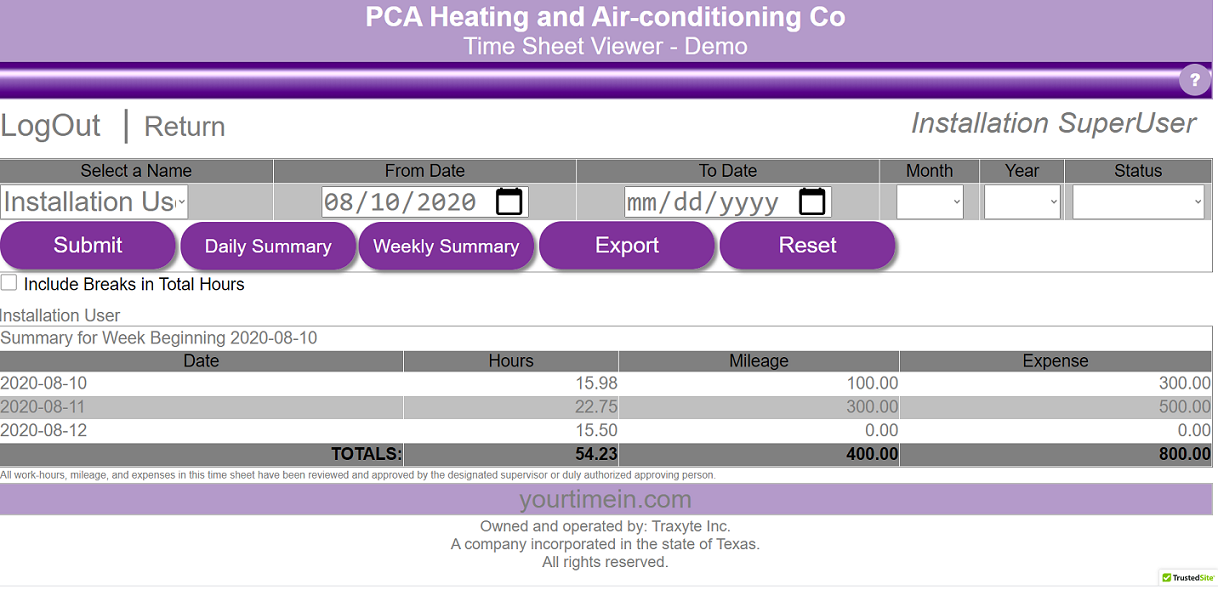
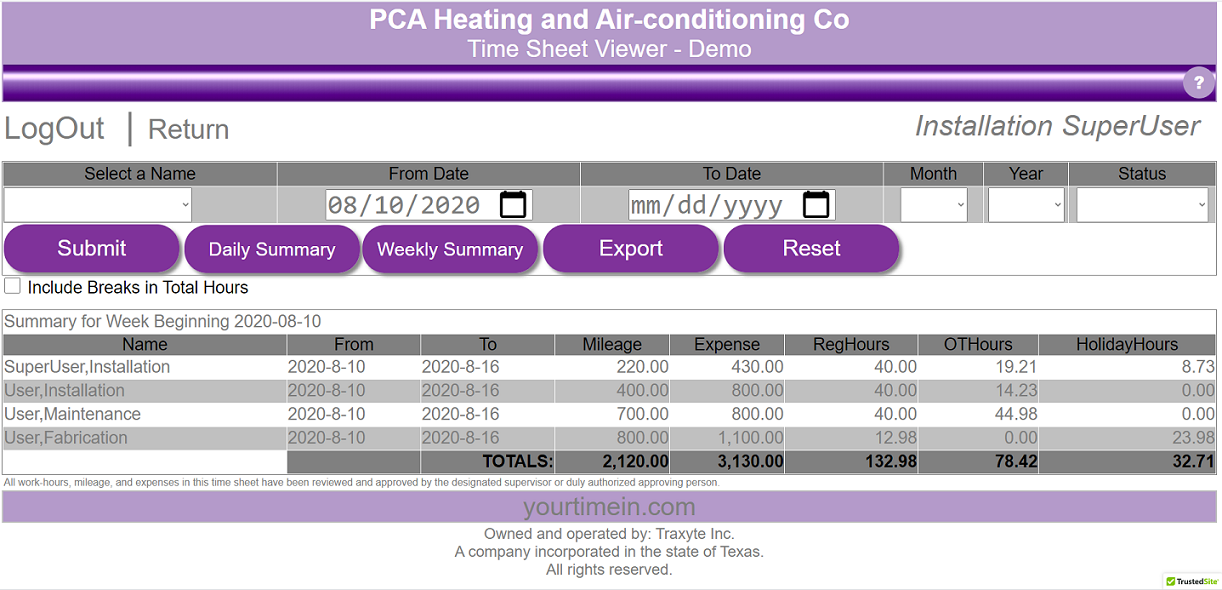
h. To create a weekly (7-day period) report, enter a beginning date and click "Weekly Summary". It returns a 7-day summary of each active employee with approved time sheets. It separates over time hours and the hours worked on a paid holiday (see image below).
i. From the summary, you can drill down for the details of the time sheet, by clicking an item on the summary list.
j. Reports are best done on a desktop or laptop, as it could show more information about the time sheets than on mobile device.
Back to top